The Lofoten Islands are a group of islands in the north of Norway, which we had planned to visit for a long time. Now, we finally did and it was amazing! The nature is absolutely beautiful: Steep mountains, amazing views, fjords, turquoise water, and in between many small villages. Perfect for people who enjoy hiking and being outdoors.
Here is our 1-3 week travel itinerary for visiting Lofoten, heavily focusing on hiking. We visited Lofoten for 9 days (excluding travel days) but also included Senja, an island further up north. If you only have one week, you can drop Senja and still enjoy Lofoten. You can also easily spend more time in Lofoten, taking some time to relax, climbing even more mountains, or waiting for bad weather to pass.
Preparations
Here is a map of our recommended hikes, camping sites, and other points of interest:
When to Visit
We visited Lofoten in August, which was ideal because we still had great weather but were already out of the main tourist season (June/July). There is no midnight sun anymore, but days are still long (daylight roughly from 4am until 10pm). At that time, also the main mosquito time is over. If you visit before June or after September, you might have snow on many mountains, making hiking difficult or even impossible. End of August, you might even see northern lights already. For hunting northern lights, I recommend the free Aurora app (iOS & Android).
Getting Around
By far the easiest way of getting around is by car. We also saw some people bike touring, going by bus, and hitchhiking, but you will need a lot more time and will likely not be able to follow this itinerary in 1-3 weeks.
Roads are in very good condition in Lofoten and it is easy to drive. While there are many mountains, the roads always go around them (or through them in tunnels), so there are no steep mountain roads. This is also great for RVs or camping vans, which are very popular in Lofoten.
You can reach Lofoten by car or by ferry from Bodø to Moskenes. There are flights and trains to Bodø. There are also ferries between some of the islands but we did not take any – only drove across bridges.
Where to Stay
Lofoten is ideal for camping, either in a tent or RV/van. There are many places on the side of the road where you can park and camp for free. But keep in mind that these spots are very popular in Lofoten and at many parking places camping is forbidden. The park4night app is useful if you don’t want to spend much time searching.
Thanks to the everyman’s right you are free to camp almost anywhere in nature as long as you are far enough away from any buildings and only stay for at most 2 nights. This only holds for tents/unmotorized vehicles, not for cars/vans.
We found it easier and more comfortable to camp at official camping places. They are cheap, are usually very well located with beautiful views, and have showers, toilets, kitchens, and other facilities that make life a lot easier. They often also have small cottages that you can rent if you prefer.

If you follow this Lofoten hiking itinerary, you can start north in Senja and drive south towards Lofoten. We split our trip into three, staying at three different camp sites, which we can all recommend: Fjordbotn Camping in Senja, Hammerstad Camping close to Svolvær, and Lofoten Beach Camp towards the south of Lofoten. We stayed multiple nights at each one and made day trips from each one. That way, we did not have to rebuild our tent everyday.
What to Bring
A short list of useful things to bring:
- Warm clothes – it is cold even in August, especially at night
- Hiking/Outdoor and Swimming clothes. You definitely need hiking shoes.
- Camping equipment
- No cash: Everything can be paid cashless
- Norwegian yr weather app, offering quite accurate rain radar
- EasyPark app for parking. While there is sometimes an extra service fee by the app, it allows you to extend your parking remotely or end it early. This helps avoid tickets or unnecessary long parking. Parking is quite expensive in general, but often the only legal option + offers free toilets.
- Binoculars for spotting birds or even whales (we didn’t see any)
Senja
The first part of this hiking itinerary does not start in Lofoten but in Senja. Senja is to the north-east of Lofoten and is less known. It has fewer visitors, which makes it more calm and peaceful. If you have the time, it is definitely worth a visit. While Senja was beautiful, Lofoten was even more spectacular to us – that’s why it was nice to start in Senja and then slowly drive south.
In Senja, we only did two hikes: Hesten and Husfjellet. There is a scenic route between the two that is worth a drive with nice fjords and beaches (e.g., to stop at. Note that the road was under construction when we visited (2023) and only open on weekends.
Hesten & Segla
2h, 6km, 1000m total elevation gain, medium difficulty

Segla is likely the most iconic peak in Senja, looking like a pointed sail (as the name suggests). While you can hike to the top of Segla, we recommend to instead hike to the neighboring peak, Hesten. From there, you have an amazing view onto Segla and the surrounding mountains and fjords.
Like almost all hikes in Senja and Lofoten, this one is short but quite steep. Compared to the others, it is not too difficult. Only in the very last part onto the top of the Hesten peak, you need your hands for climbing/scrambling a bit. However, you can just omit the peak if you prefer since the view is not really any better from there. While there are many alternative routes, the nicest route goes straight up to the Segla view and from there to the top of Hesten. This is also the easiest route.
There is official parking at the trail head in Fjordgard, which you can pay with EasyPark. There are also free toilets at the parking. Note that parking is prohibited anywhere else in Fjordgard if you do not live there.
Husfjellet
3h, 8km, 1200m total elevation gain, easy/medium difficulty

Again, the hike starts at an official parking in Skaland, which offers EasyPark. The start of the route is not very spectacular, but the view improves as you hike up. Most of the hike is not super steep. Only the last few hundred meters are quite steep. Again, no climbing is necessary.
It can be very muddy, so wear suitable hiking shoes and go during dry weather.
North of Lofoten
From Senja, we drove towards Svolvær, which is the biggest “city” in Lofoten. While there are some cute houses in Svolvær, there are also bigger and more modern buildings and a lot of industry, which somewhat ruin the nice village. It also smelled quite badly like dead fish. Luckily, we stayed a bit outside of Svolvær at Hammerstad Camping, which is a good base for many hikes in the north/middle of Lofoten.
Fløya & Djevelporten
2h, 4km, 1000m total elevation gain, hard difficulty


Starting right in Svolvær at the trail head (with EasyPark), the hike is quite steep. Since we had slight rain, it was also a bit muddy and slippery, which made the hike quite challenging but also a lot of fun.
On the way, you will see the Svolværgeita (also called “the goat”), which is a popular destination for climbers with a daring jump at the top. There are multiple good viewpoints (if the weather is not too cloudy – as it was for us).
Djevelporten or devil’s gate is another highlight on this tour: It is a big rock in between mountain walls. It is popular to climb onto the rock and take pictures. However, we did not dare to since the stone seemed a bit slippery from the rain.
Tjeldbergtind
2h, 5km, 600m total elevation gain, easy/medium difficulty

Less known and less popular than Fløya, Tjeldbergtind is on the other side of Svolvær and also offers nice views. It seems like many locals like the mountain for working out and jogging. The hike is easier and not as spectacular as Fløya, but we also enjoyed it. If you do not have much time, you can easily skip this hike (or Fløya).
There is not official parking at Tjeldbergind at the time of writing, but there are free parking spots at the side of the road, close to the trail head. Some people also park at the nearby Esso gas station or Kiwi supermarket.
Festvågtind
2h, 4km, 1000m total elevation gain, hard difficulty

The hike to Festvågtind was one of the most challenging ones we did in Lofoten since it involves some climbing and steep parts. However, it is still absolutely doable with basic fitness and experience. Again, it becomes much harder if the weather is rainy and the ground becomes slippery.
Even if you do not hike all the way up to the peak, you can hike up midway to the lake, from where you already have nice views over Henningsvær. This part of the hike is not too difficult. You can also swim in the lake. The second part to the top of Festvågtind is more challenging, but the view is even more beautiful from up top.
You can park for free close to the trail head if there are still spots left. Make sure to visit Henningsvær while you are in the area!
Henningsvær
Henningsvær is a cute little fisher town – our favorite village in Lofoten. If you do not mind walking, you can leave your car at one of the free parking spots close to Festvågtind. Otherwise, there is enough paid parking inside the village.

The village itself is quite small and can be easily explored by foot. We recommend to stroll through the streets with the nice wooden houses, enjoy the view over the harbor and onto Festvågtind, and go to the soccer field at end of the island. The soccer field is a very popular place for drone shots but also worth a visit without a drone. Around the soccer field and all over the village (and many other places in Lofoten), there are lots of wooden structures to dry fish.

Hoven
1.5h, 4.5km, 700m total elevation gain, easy/medium difficulty

We visited Hoven on the way from the north of Lofoten to the south. The mountain is easily visible from far away as its surroundings are unusually flat for Lofoten standards.
The hike is the easiest we did on Lofoten. The views are nice but not spectacular – if you are short on time, feel free to skip this hike. We parked at the paid golf course parking, right next to the Hoven trail head.
We believe that the area around Hoven is a good place to spot whales and other fish, but did not see any ourselfs. Still, bring your binoculars.
South of Lofoten
The south of Lofoten is more touristy but, from our perspective, even more beautiful and breathtaking than the north. The hikes to Ryten, Reinebringen, and Offersøykammen were our favorite ones. Do not miss them!

A good base for exploration is Lofoten Beach Camp, where we stayed. It is by far the largest camping ground we saw on Lofoten but also offers lots of room and is nice and modern. It is well located and you can watch the sunset at the beach.
Offersøykammen
1.5h, 3km, 800m total elevation gain, easy/medium difficulty

The hike to Offersøykammen is among the best in terms of effort/reward-ratio. It is comparably short and easy, yet very rewarding with a fantastic 360° view from the top. Watch out for the small, heart-shaped lake.
Parking is possible for free at a public parking nearby (with free toilet). From there, you can follow the road to the trail head.
Haukland Beach & Vik Beach
Not too far from Offersoykammen, there are two particularly beautiful beaches: Haukland Beach and Vik Beach. Both offer crystal clear and turquoise (and cold!) water with a fine, sandy beach.

We preferred Vik Beach over Haukland Beach because it was less crowded. There is a designated parking area at Haukland beach, which was full when we arrived. For reaching Vik Beach, you can park at one of the small parking spaces at the side of the road. While we enjoyed Vik Beach the most, there are many beautiful beaches in Lofoten and we do recommend to just stop and get out of the car at the many nice beaches you will pass as you drive around Lofoten.
Kvalvika Beach & Ryten
4h, 11km, 1500m total elevation gain, medium difficulty


The hike to Ryten and Kvalvika Beach is best started from the paid parking here. From there, it is roughly 1.5h to the top of Ryten, where you will have a very nice view over the ocean and onto Kvalvika Beach with its turquoise water. It is also a great spot to watch the sunset.

Kvalvika Beach is only accessible by foot and a popular place for free camping. The descent to the beach was surprisingly difficult after sunset but definitely doable. Spending the night at the beach was a really nice experience.
Reine
Reine is typical nice, small village in Lofoten. During the day it is possible to walk around the old, red fisher huts at the end of the town; in the evening the area is closed as it belongs to a hotel and the huts are rented.

We also very much recommend a kayak tour around Reine if the weather is nice. It is a different and unique perspective onto the nice landscape and the clear, blue waters. We did our tour with Reine Paddling and enjoyed it very much.

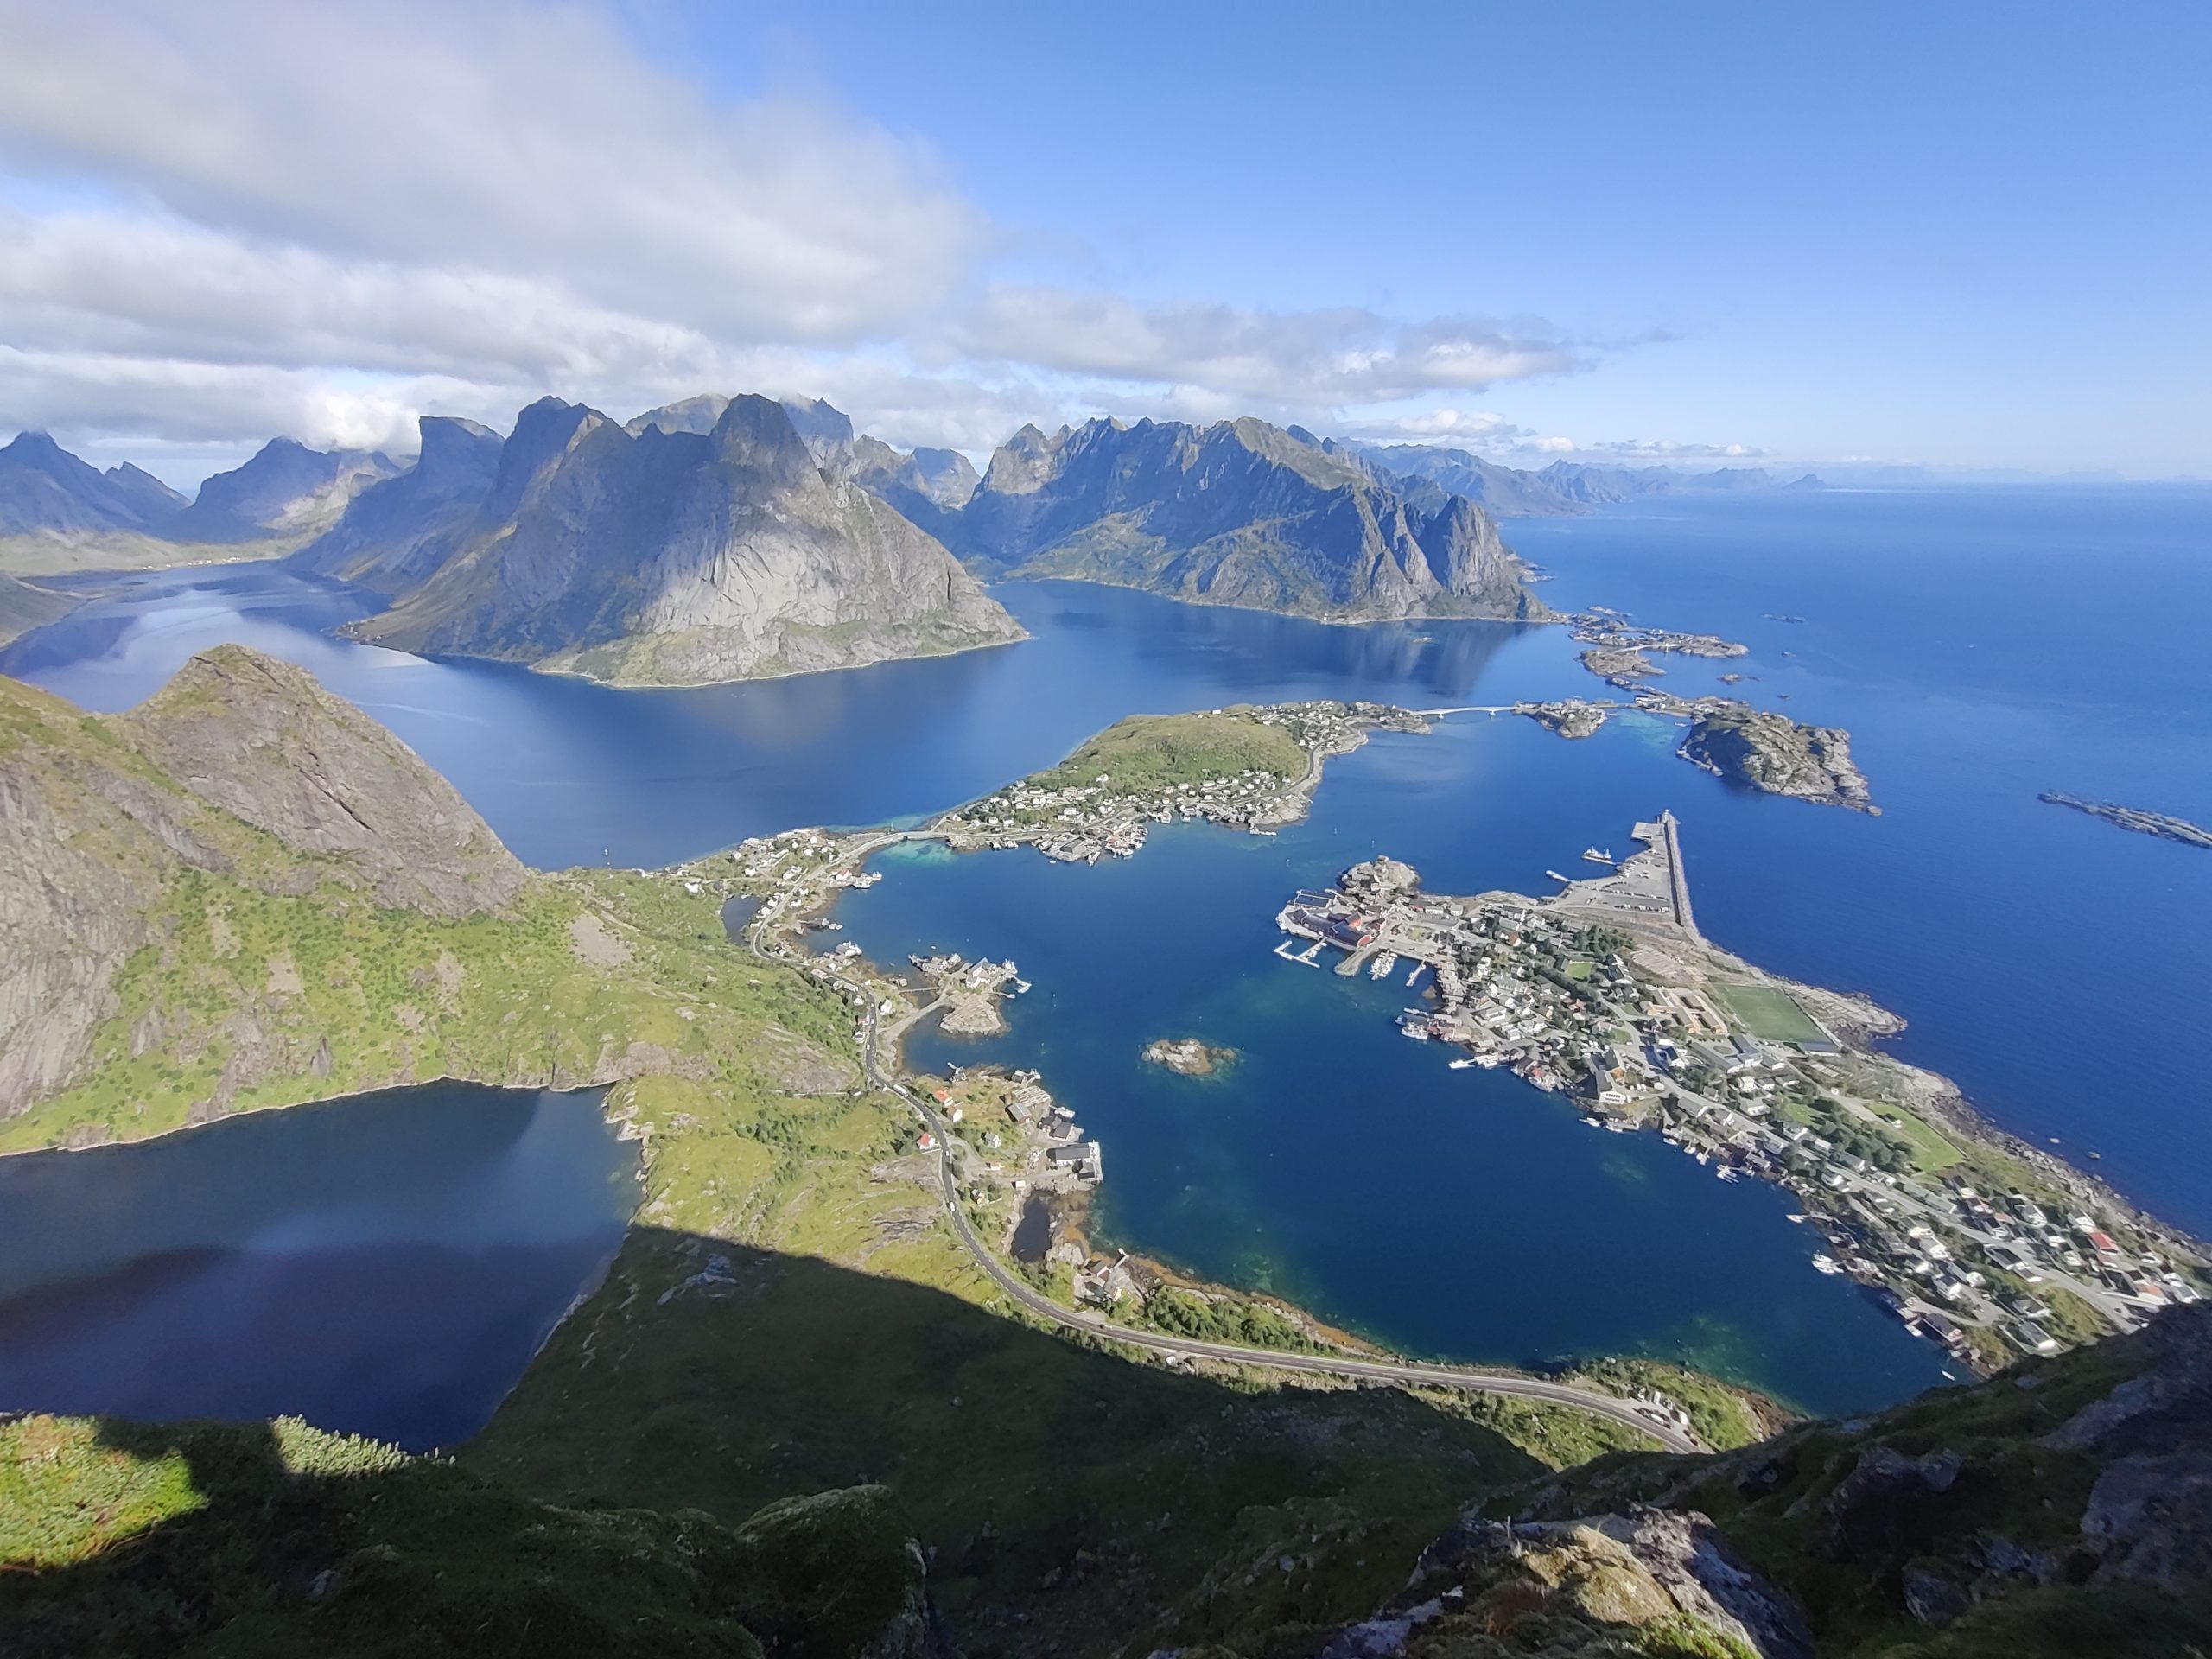
Reinebringen
1.5h, 5km, 1000m total elevation gain, easy/medium difficulty

Reinebringen is arguably the most popular hike in Lofoten and rightfully so: The views from the top over the Reine village are really beautiful! There are stairs all the way from the trail head up to the viewpoint, making this hike quite accessible and easy.
We parked at one of the paid parking spots in Reine (with a free toilet in the shop where you pay). If you drive a bit further, there are slightly cheaper ones but without free toilets. Do also visit the village of Reine while you are here.
Å
The small village with the funny name “Å” (pronounced “O”) is located at the southern tip of Lofoten, at the end of the scenic route E10 that goes through all of Lofoten. From the free parking at the end of the road (including free toilet), you can quickly walk to the center of Å.

The small, historic center of Å feels a bit like a museum: There are many red fisher houses, small shops, and many tourists. It is still worth walking through the streets and trying the cinnamon buns at the museum’s café.
If you follow the path from the parking into the other direction, you quickly reach a very nice and very accessible view point over the coast.
Hopefully, this Lofoten itinerary is a helpful for inspiration and planning your trip. We hope you enjoy visiting Lofoten & Senja just as much as we did!
Feel free to check out our other hiking and travel itineraries, too 🙂
4 responses to “Lofoten Hiking Itinerary”
Muchas gracias. ?Como puedo iniciar sesion?
There is no login; you can comment without 🙂
I genuinely enjoy examining on this web site, it has got excellent articles.
Great article! This is the kind of info that are supposed to be shaded arpund the internet.
Disgrace on Google for not positioning this publish upper!